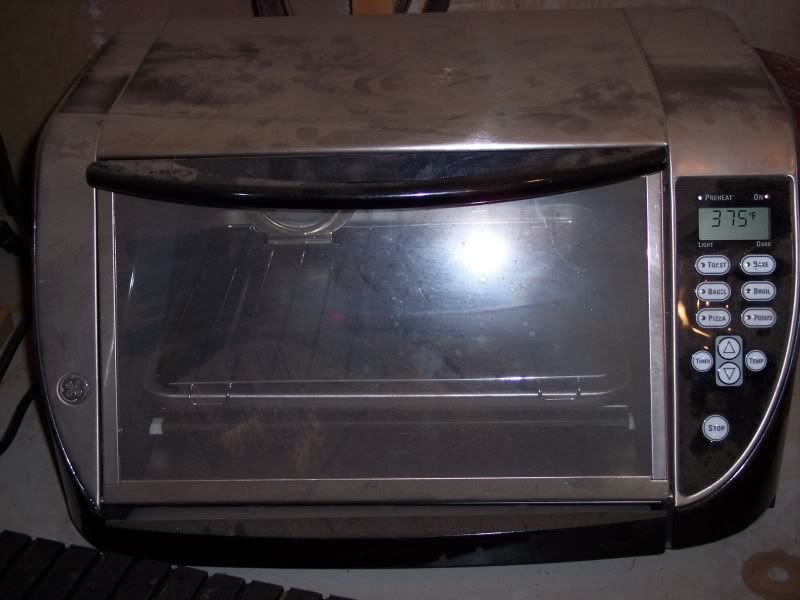
ench it in 100 degree Tough Quench oil, and after it has cooled to 125 degrees place it in a toaster oven at 375 for 2 hours, then air cool to room temp, and then back in the toaster oven at 375 for another 2 hours.
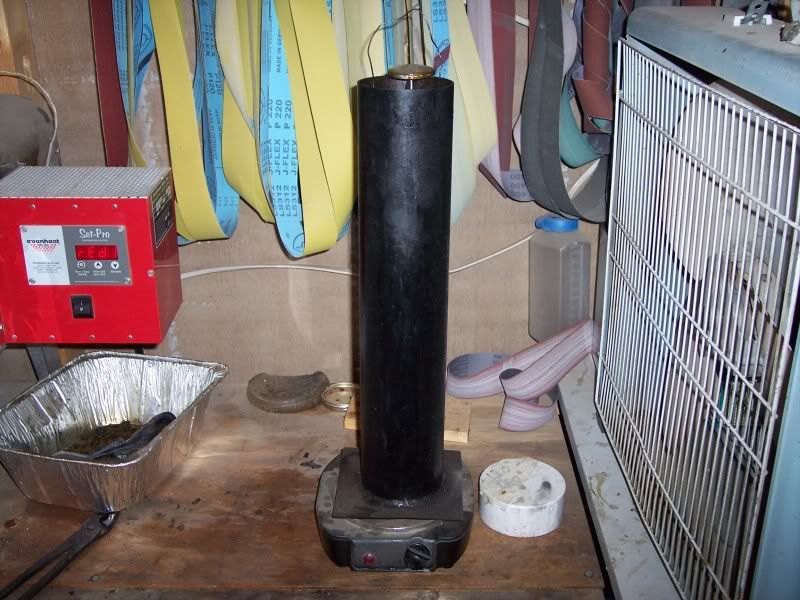
Here is a pic of the Even Heat with blade inside, redi to start heating. Notice it is placed edge up

Here it is with 4 minutes left on the hold cycle, it was held for 20 minutes

Here is the quench tank, the blade will go in point first, just as fast as I can get it in the tank, I didn't get on of the blade going in, not enough hands.
Here it is in the toaster oven, at 375
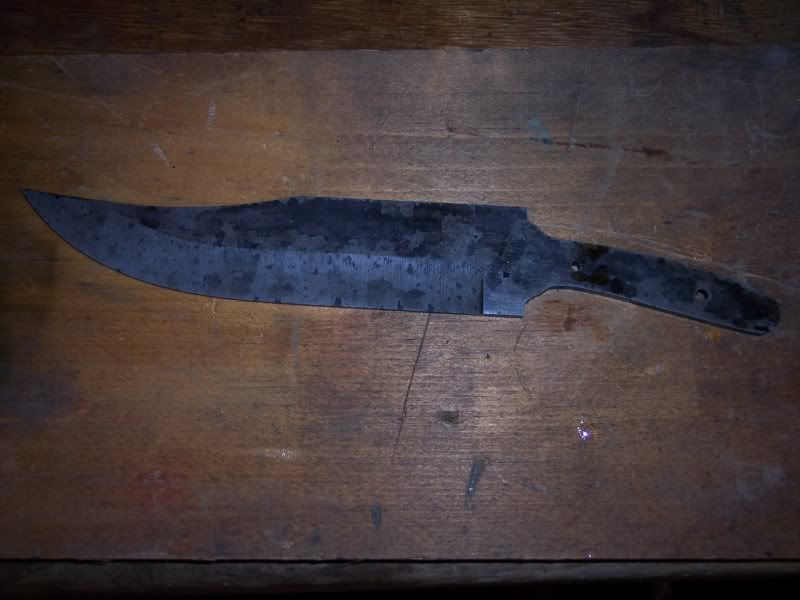
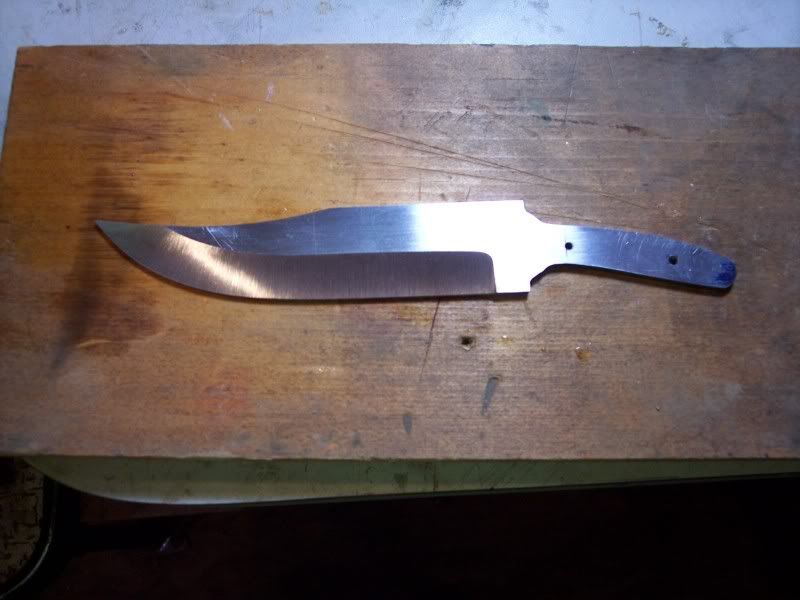
Here is the blade after the heat treat is done, notice the scale, kinda ugly now.
Here we are ready to cleanup and finish grinding the hollow grind.
Grinding the hollow grind down to .020" at the edge.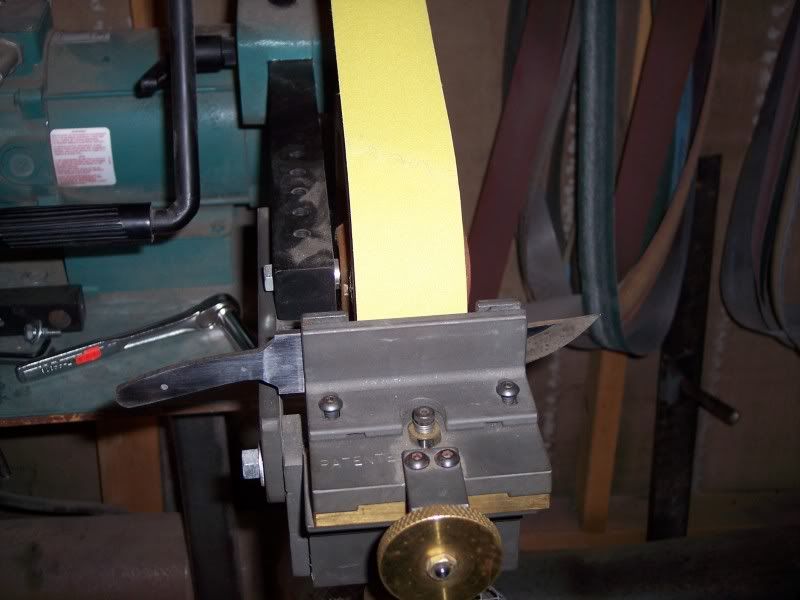
Ready to hand sand

After hand sanding, to 400 grit then back to 320 grit, for a satin finish.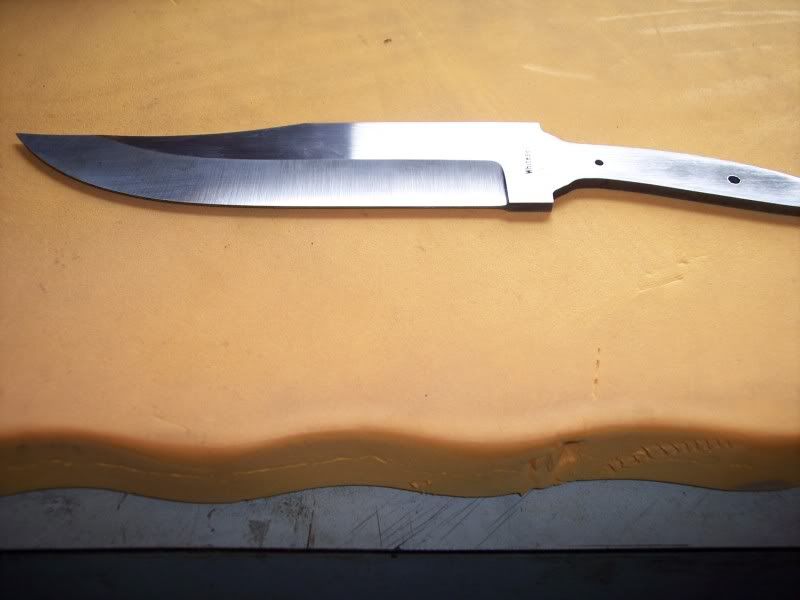
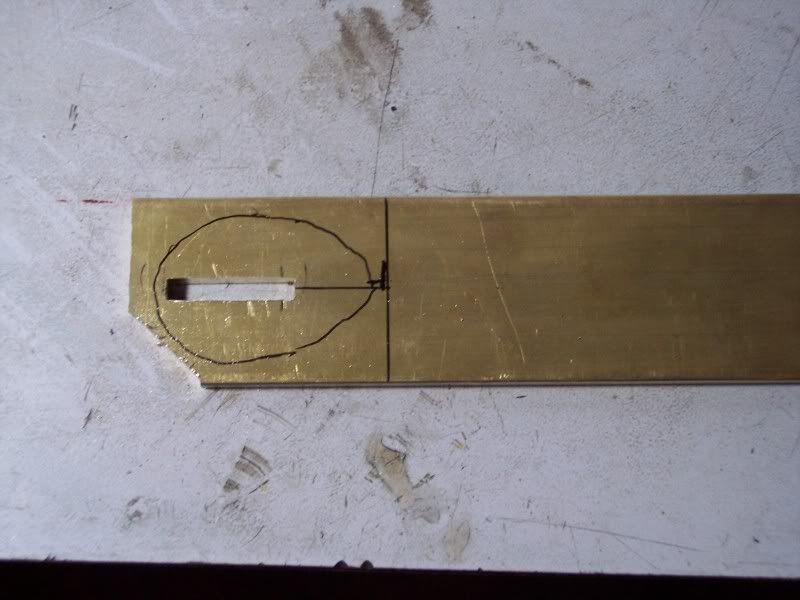
Now we are ready to make the guard, here the guard is layed out on the brass bar stock, and ready to mill the slot in.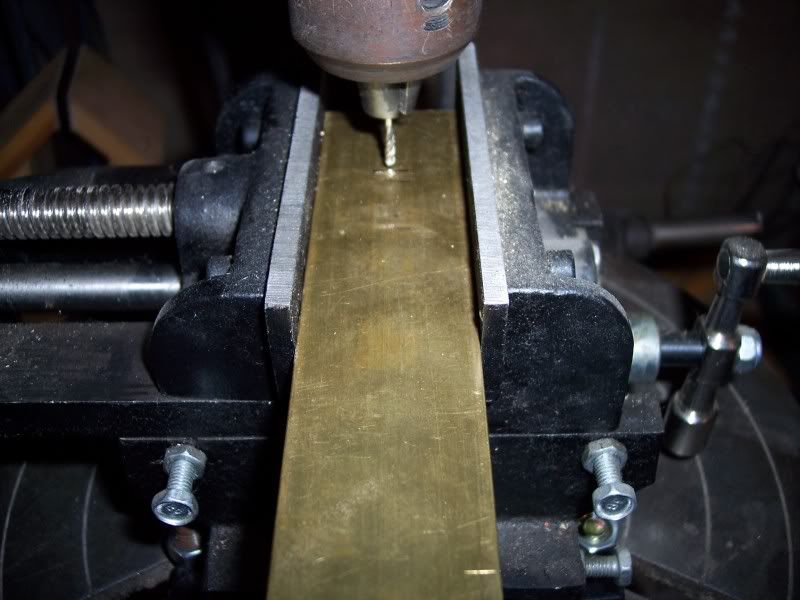
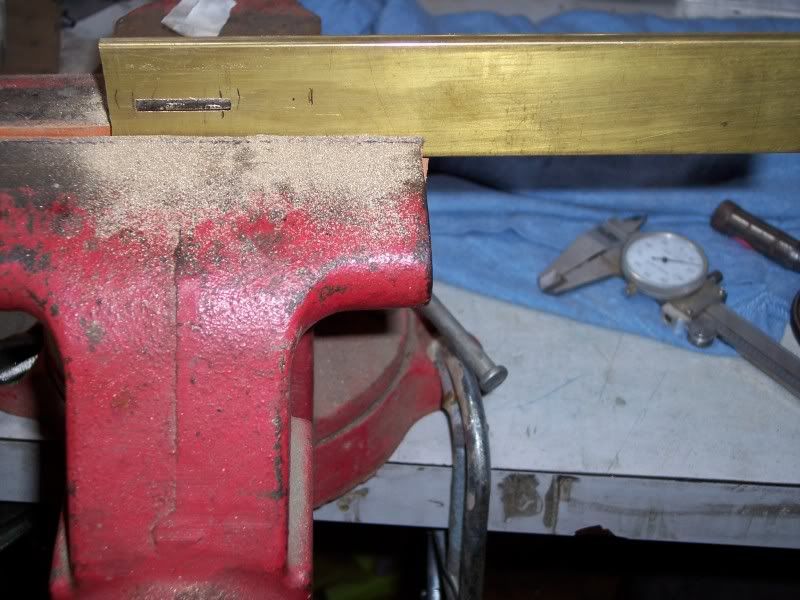
The slot is milled in then final fit is done with a file.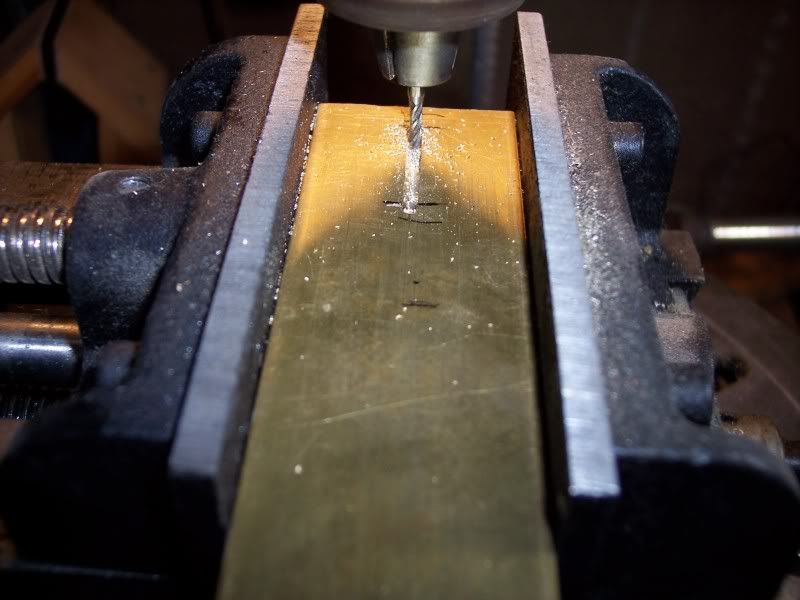
Final fit being done here, with a file, slow and easy we don't want a loose fit.
Here we are, ready to rough shape the guard. Then the front and back sides will be sanded and buffed before it is installed on the tang. The edges will be left rough at this time, it will be sanded down to the antler, and shaped after it is all put together.
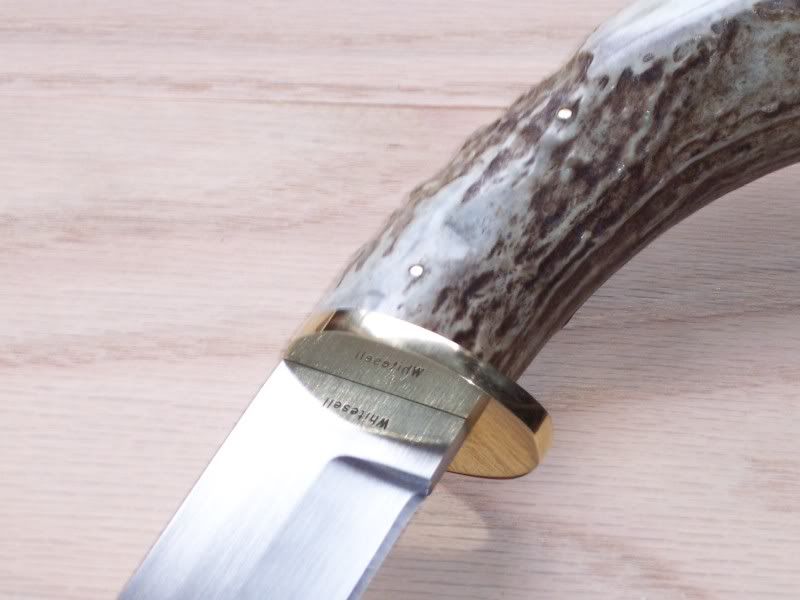
Guard is being attached with JB Weld, to seal out moisture. The guard will be held secure with the JB Weld and the antler being tight against it on the back side, as well as the shoulders that were filed in the ricaso, on the front side of the guard.

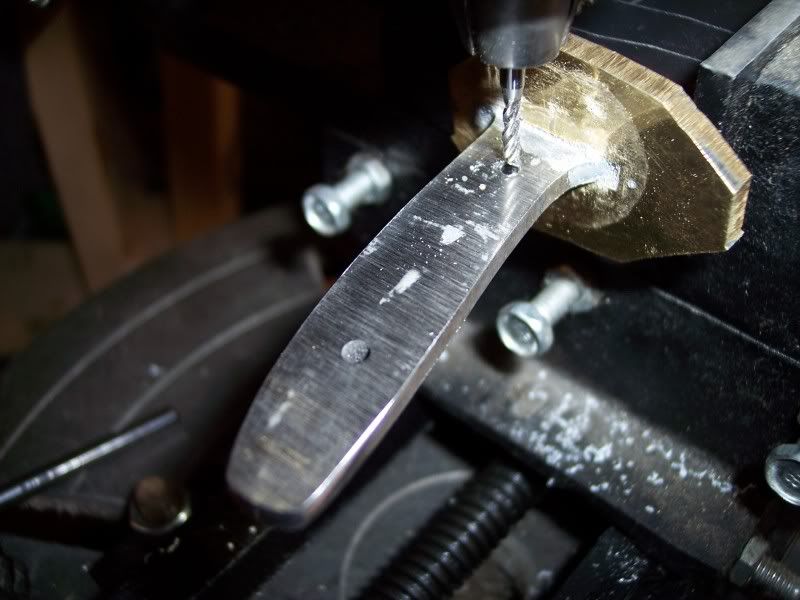
The guard is secure, now we are ready to attach the antler to the tang. The antler was drilled and the pith removed, and will be held secure in two ways, with two pins and two part epoxy filling the void around the tang. I am drilling the holes in the antler a little different on this one, than what I nomally do. This time I am drilling the holes now, instead of before the blade is heat treated. The tang was drilled before heat treat, so now I have to match the holes in the antler with the tang holes. To do this I clamp the blade in the mill vise, on the drill press, and line the 3/32" end mill with the tang hole, then slide the antler in place and hold tight against the guard, and make a small cut into the antler with the end mill, then change to a drill bit, and drill through the antler, through the existing hole in the tang and out the other side of the antler. Then reset for the second hole, and put a pin in the first hole and drill the second hole in the same way as the first. The reason I use an end mill to start the hole, is that the mill won't wander around on the uneven surface of the antler, it stays straight allowing the hole to be in line with the tang hole, instead of being off to one side.
Here it is drilled and dry fit and ready for the dommed pins to be made, note the mosaic pin where the brow tine was cut off.

On this knife I will use a dommed pin, that I make on the drill press, using a file to round the end of the pin, then sand paper to polish it up to a 600 grit finish.
Being sanded

And here it is dry fit, with dommed pins, mosaic pin, all ready for epoxy. Note the rodent teeth marks in the antler, this is a shed antler found by the owner of this knife, gives it a little character I think, It will be smoothed out some, but will still be there.
The next step is to epoxy and let her dry for a day, then we will grind the guard down to the antler, and do a final shape of it. and then remove some of the sharp texture of the antler, just enough to make it feel good in the hand.
I didn't get pics of the handle being finished, but here is how I do it.
On deer antler the crown is sanded smooth on the platen, then I switch to a slack belt, and work up through the grits to 600, then it is sealed with super glue, let it dry and sand from 320 thru 600 and apply super glue again, repeating three to four times at least, what ever it takes to get all the pores sealed.
Then the guard is sanded down to the antler with 120 grit on the platen, and the bottom of the guard is shaped at the same time. Then switch to the slack belt and J flex belts starting at 120 blend into the antler being careful not to dip into the antler. work up through the grits again to 600. then sand any other places on the antler that need smoothed out, such as where the brow tine was cutt off, also seal the brow tine spot with super glue as the crown was done. then give it a light buff, with white compound if you like. Then wash it down with a cloth damp with denatured alcohol, and oil the blade and it is done.
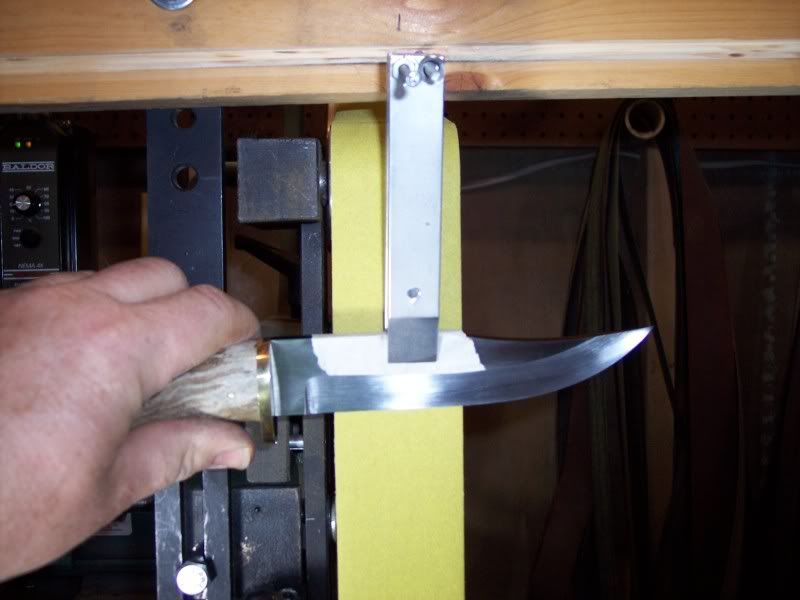
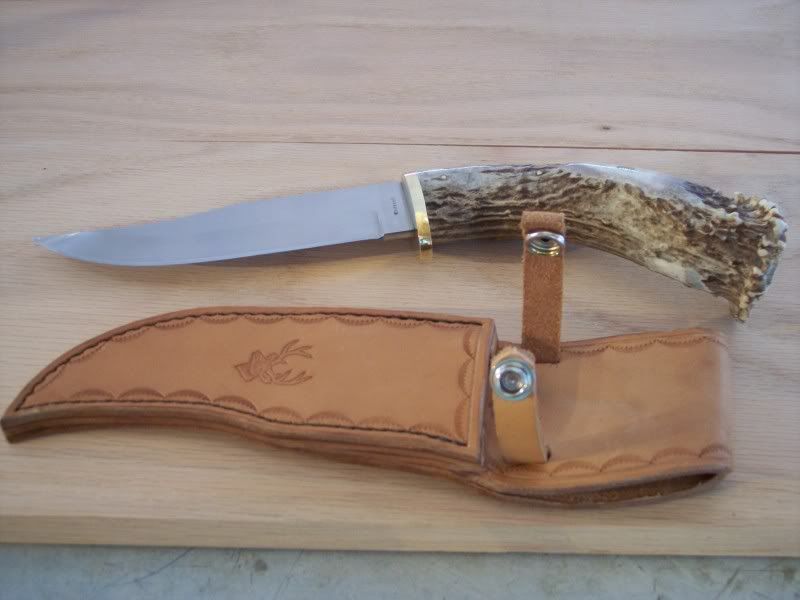
Here is the knife, being sharpened on the Bader.
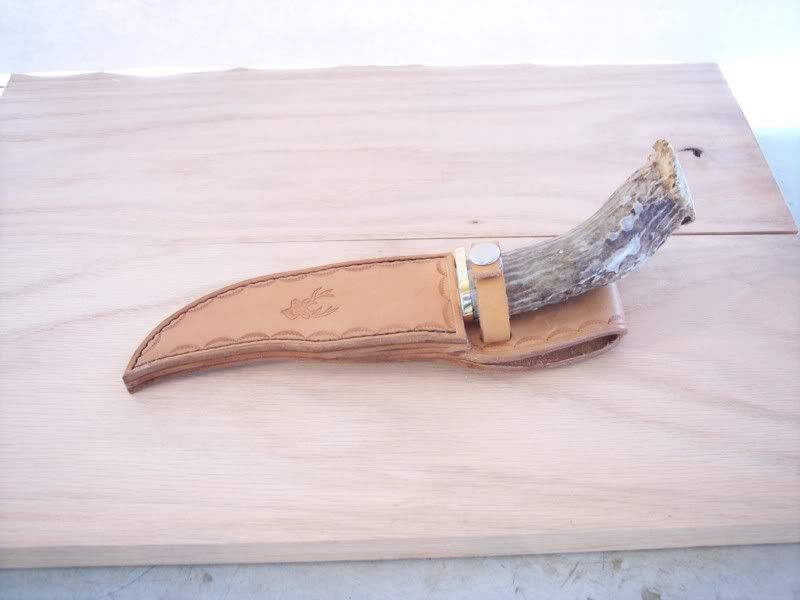
Knife and sheath done
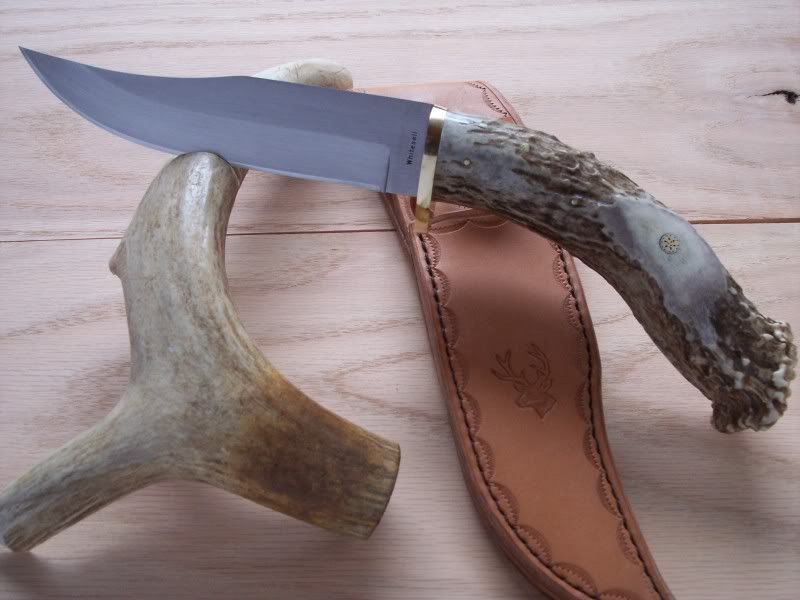
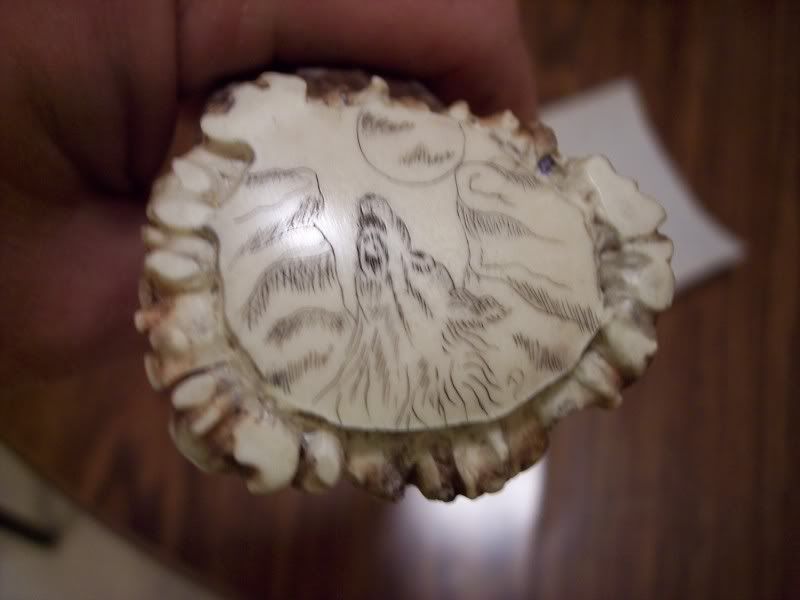
This knife got a howling wolf scrimshawed in the crown. Scrimshaw by Darren McCollom.
Thanks for looking, I hope you enjoyed this one, and if you are a fellow knife maker I hope you maybe learned a trick or two that may be of some help.
Till next time, Stay Sharp.
Dale
Here is a pic of the Even Heat with blade inside, redi to start heating. Notice it is placed edge up
Here it is with 4 minutes left on the hold cycle, it was held for 20 minutes
Here is the quench tank, the blade will go in point first, just as fast as I can get it in the tank, I didn't get on of the blade going in, not enough hands.
Here it is in the toaster oven, at 375
Here is the blade after the heat treat is done, notice the scale, kinda ugly now.
Here we are ready to cleanup and finish grinding the hollow grind.
Grinding the hollow grind down to .020" at the edge.
Ready to hand sand
After hand sanding, to 400 grit then back to 320 grit, for a satin finish.
Now we are ready to make the guard, here the guard is layed out on the brass bar stock, and ready to mill the slot in.
The slot is milled in then final fit is done with a file.
Final fit being done here, with a file, slow and easy we don't want a loose fit.
Here we are, ready to rough shape the guard. Then the front and back sides will be sanded and buffed before it is installed on the tang. The edges will be left rough at this time, it will be sanded down to the antler, and shaped after it is all put together.
Guard is being attached with JB Weld, to seal out moisture. The guard will be held secure with the JB Weld and the antler being tight against it on the back side, as well as the shoulders that were filed in the ricaso, on the front side of the guard.
The guard is secure, now we are ready to attach the antler to the tang. The antler was drilled and the pith removed, and will be held secure in two ways, with two pins and two part epoxy filling the void around the tang. I am drilling the holes in the antler a little different on this one, than what I nomally do. This time I am drilling the holes now, instead of before the blade is heat treated. The tang was drilled before heat treat, so now I have to match the holes in the antler with the tang holes. To do this I clamp the blade in the mill vise, on the drill press, and line the 3/32" end mill with the tang hole, then slide the antler in place and hold tight against the guard, and make a small cut into the antler with the end mill, then change to a drill bit, and drill through the antler, through the existing hole in the tang and out the other side of the antler. Then reset for the second hole, and put a pin in the first hole and drill the second hole in the same way as the first. The reason I use an end mill to start the hole, is that the mill won't wander around on the uneven surface of the antler, it stays straight allowing the hole to be in line with the tang hole, instead of being off to one side.
Here it is drilled and dry fit and ready for the dommed pins to be made, note the mosaic pin where the brow tine was cut off.
On this knife I will use a dommed pin, that I make on the drill press, using a file to round the end of the pin, then sand paper to polish it up to a 600 grit finish.
Being sanded
And here it is dry fit, with dommed pins, mosaic pin, all ready for epoxy. Note the rodent teeth marks in the antler, this is a shed antler found by the owner of this knife, gives it a little character I think, It will be smoothed out some, but will still be there.
The next step is to epoxy and let her dry for a day, then we will grind the guard down to the antler, and do a final shape of it. and then remove some of the sharp texture of the antler, just enough to make it feel good in the hand.
I didn't get pics of the handle being finished, but here is how I do it.
On deer antler the crown is sanded smooth on the platen, then I switch to a slack belt, and work up through the grits to 600, then it is sealed with super glue, let it dry and sand from 320 thru 600 and apply super glue again, repeating three to four times at least, what ever it takes to get all the pores sealed.
Then the guard is sanded down to the antler with 120 grit on the platen, and the bottom of the guard is shaped at the same time. Then switch to the slack belt and J flex belts starting at 120 blend into the antler being careful not to dip into the antler. work up through the grits again to 600. then sand any other places on the antler that need smoothed out, such as where the brow tine was cutt off, also seal the brow tine spot with super glue as the crown was done. then give it a light buff, with white compound if you like. Then wash it down with a cloth damp with denatured alcohol, and oil the blade and it is done.
Here is the knife, being sharpened on the Bader.
Knife and sheath done
This knife got a howling wolf scrimshawed in the crown. Scrimshaw by Darren McCollom.
Thanks for looking, I hope you enjoyed this one, and if you are a fellow knife maker I hope you maybe learned a trick or two that may be of some help.
Till next time, Stay Sharp.
Dale
My Knives Are Handmade part 1
| Posted on January 26, 2010 at 1:21 PM |  comments (2) comments (2) |
I have had alot of people ask if my knives are handmade or if I purchase blades and put handles on them. I make my knives including my blades totaly in my shop. I started out making kit knives about 8 years ago, and then quit them after about 2 years, and since have made my own blades for a little over 6 years now. I am flattered that people think my knives look good enough to be factory blades, but they are not factery blades.
So in this issue of my blog, I will show a knife being made from start to finish. It is a order for a custom Pro-Skinner with the customers whitetail deer antler for a handle.
We may run this over a couple of issues to finish, but here is the start of it.
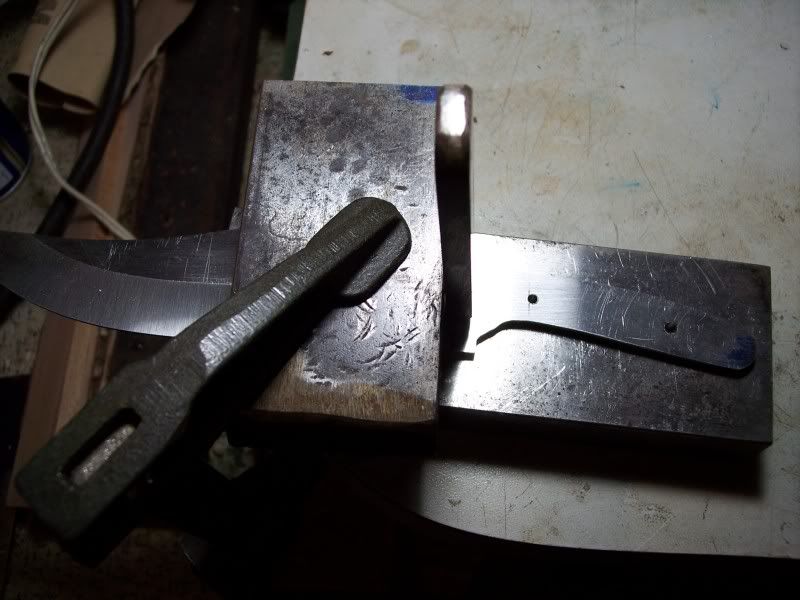
here is a pic of the knife layed out and ready to cut out of 0-1 bar stock
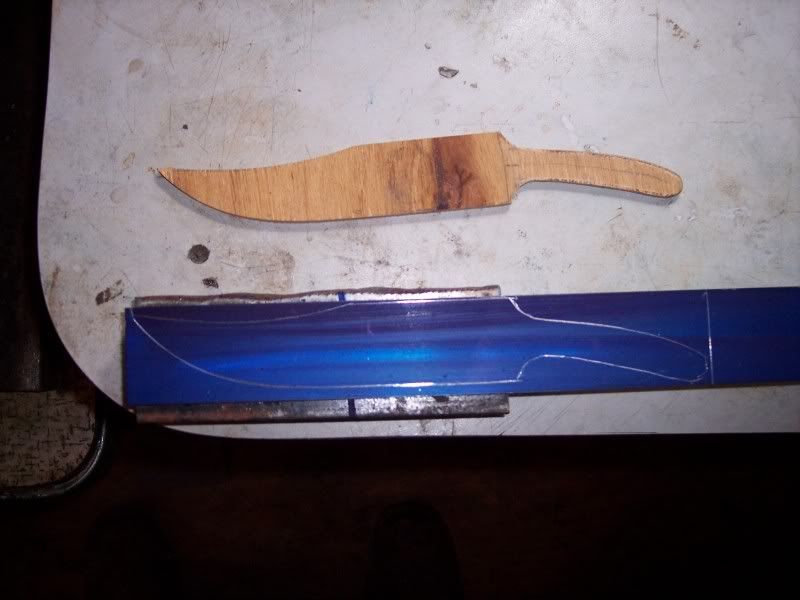
knife being cut on the band saw
Blade cut out, shown with wooden pattern and 0-1 bar stock

Blade being rough ground on Bader BIII 2x72 grinder.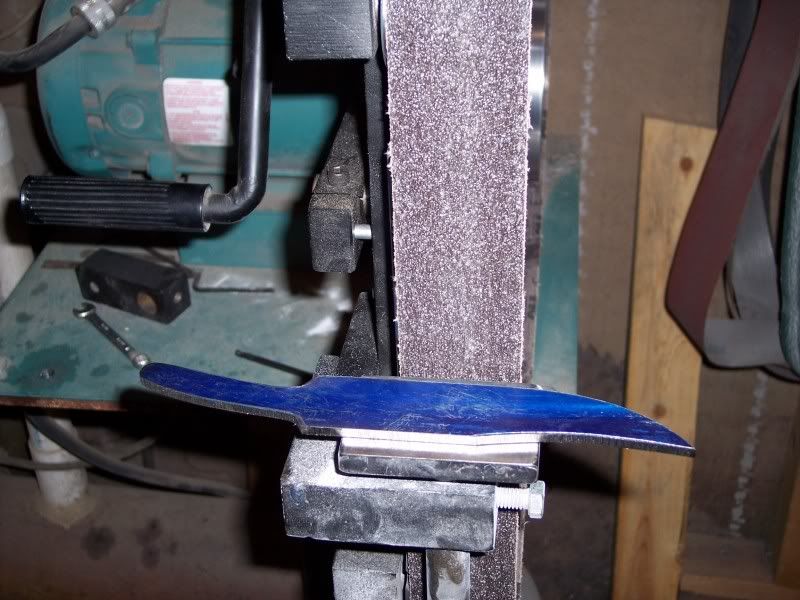
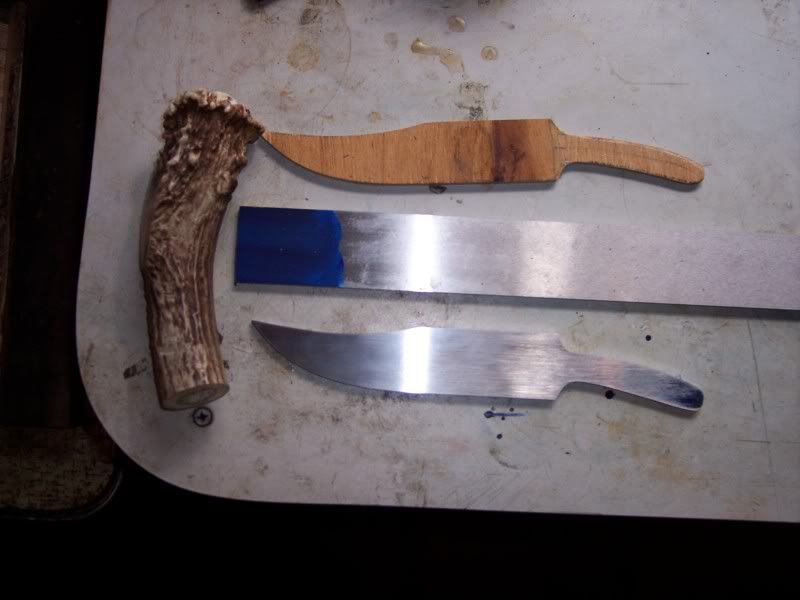
Here is the blade, rough ground, with the wood pattern, and the antler to be used for the handle
Now we file in the flats on the tang, for the guard to seat against, using a file guide clamped to the tang.
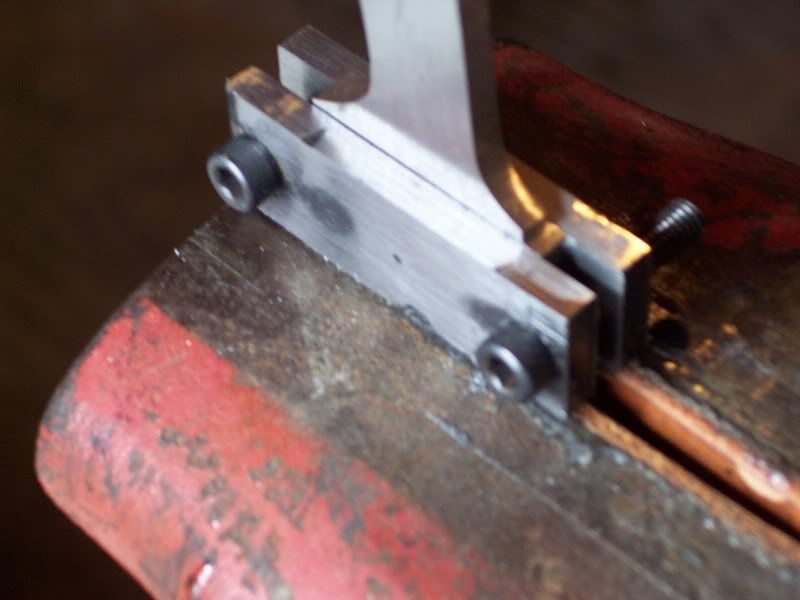
And here the flats are filed and all inside square corners rounded out with a round file, this is done to prevent stress risers, which can cause cracks when heat treated.
Here are all the pieces togather, including a mock guard, made of wood the same thickness as the brass guard will be made from, I use the wood guard to line everything up to drill the pin holes through the antler and tang, prior to heat treat.

Here's what it will look like. ready to drill the pin holes.

The guard won't be that big, this is just used as a fixture to aid in drilling the pin holes through. I may change my procedure on this part of a hidden tang knife, if so I will show it as a seperate part. Next we will grind the hollow grind in and stamp my makers mark, drill pin holes, and then the most important part of any knife, the heat treat.
This knife will have a hollow grind. To do this I use a grinding jig. Some makers frown on the use of jigs, to me it is just another tool, used to do a job a little easier.
Here is a pic of the jig, and 8 inch contact wheel on the Bader BIII that I use for hollow grinding.

Here is the blade being ground
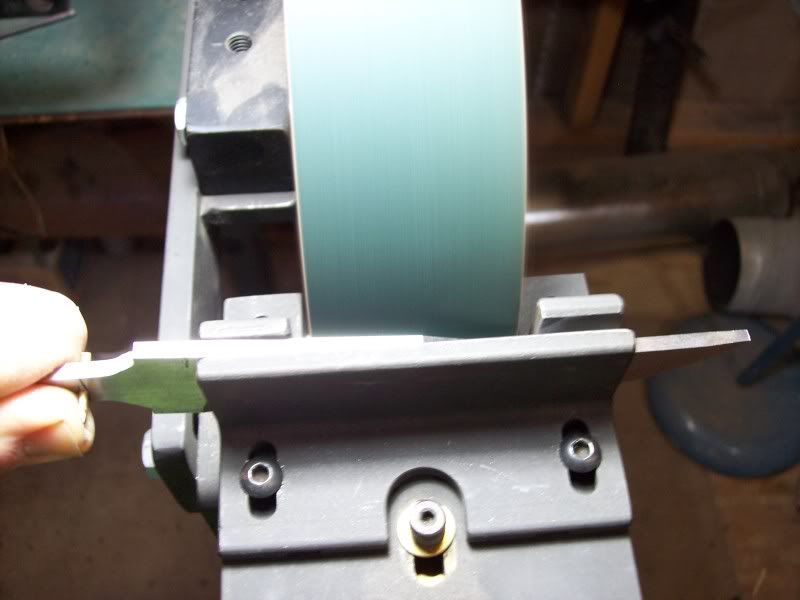
here is the start of the hollow grind, using a 60 grit belt.

When I get close to .040" thickness I go to a 120 grit, and then take the edge down to .040" and then finish with a 240 grit and that is all that will be ground before it is heat treated.
Here we are looking at the edge, at .040" thick, note the plung lines are a little bit off, I will take care of that after the heat treat, during the finish grind.

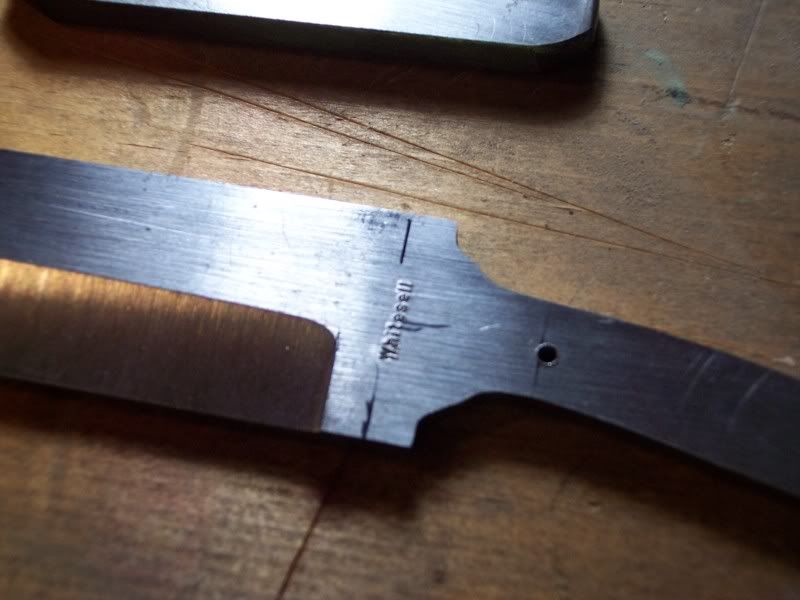
Here it is ground and ready to stamp my makers mark.
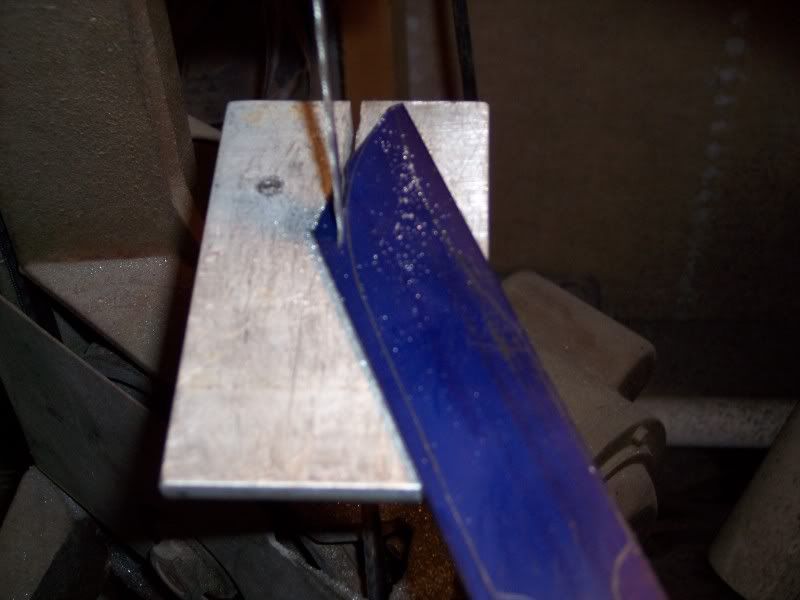
Now we are ready to stamp, I use a name stamp, and just whack it hard with a hammer. Of course it is lined up and I use a heavy bar of steel under and on top of the blade to hold it all from bouncing around, also the top piece is used to rest the back of the stamp against.. My makers mark is Whitesell.
And here it is after it is stamped and the flats of the blade will be sanded on the 4x36" belt sander with a 240 grit belt, and it is ready to heat treat.
So in this issue of my blog, I will show a knife being made from start to finish. It is a order for a custom Pro-Skinner with the customers whitetail deer antler for a handle.
We may run this over a couple of issues to finish, but here is the start of it.
here is a pic of the knife layed out and ready to cut out of 0-1 bar stock
knife being cut on the band saw
Blade cut out, shown with wooden pattern and 0-1 bar stock
Blade being rough ground on Bader BIII 2x72 grinder.
Here is the blade, rough ground, with the wood pattern, and the antler to be used for the handle
Now we file in the flats on the tang, for the guard to seat against, using a file guide clamped to the tang.
And here the flats are filed and all inside square corners rounded out with a round file, this is done to prevent stress risers, which can cause cracks when heat treated.
Here are all the pieces togather, including a mock guard, made of wood the same thickness as the brass guard will be made from, I use the wood guard to line everything up to drill the pin holes through the antler and tang, prior to heat treat.
Here's what it will look like. ready to drill the pin holes.
The guard won't be that big, this is just used as a fixture to aid in drilling the pin holes through. I may change my procedure on this part of a hidden tang knife, if so I will show it as a seperate part. Next we will grind the hollow grind in and stamp my makers mark, drill pin holes, and then the most important part of any knife, the heat treat.
This knife will have a hollow grind. To do this I use a grinding jig. Some makers frown on the use of jigs, to me it is just another tool, used to do a job a little easier.
Here is a pic of the jig, and 8 inch contact wheel on the Bader BIII that I use for hollow grinding.
Here is the blade being ground
here is the start of the hollow grind, using a 60 grit belt.
When I get close to .040" thickness I go to a 120 grit, and then take the edge down to .040" and then finish with a 240 grit and that is all that will be ground before it is heat treated.
Here we are looking at the edge, at .040" thick, note the plung lines are a little bit off, I will take care of that after the heat treat, during the finish grind.
Here it is ground and ready to stamp my makers mark.
Now we are ready to stamp, I use a name stamp, and just whack it hard with a hammer. Of course it is lined up and I use a heavy bar of steel under and on top of the blade to hold it all from bouncing around, also the top piece is used to rest the back of the stamp against.. My makers mark is Whitesell.
And here it is after it is stamped and the flats of the blade will be sanded on the 4x36" belt sander with a 240 grit belt, and it is ready to heat treat.
Hunting season is about here
| Posted on August 16, 2009 at 5:22 PM | comments (0) |
I know it is just August, but, here in Mo. hunting season is about here, with archery season opening on Sept. 15th. That is a month away and I still haven't shot my bow. so this month I would like to remind all you hunters of a few things to remember to do before opening day of season. So if you are a hunter, it is time to get things ready to go, and that includes:
1: getting that old knife sharp. Or you could just buy a new handmade custom knife, maybe one made by me.
2: get your bow checked out for any problems it may have, bad string for example.
3: check your arrows and broadheads.
4: it is about time to sight those rifles in as well
5: make sure you have plenty of ammo, some may be hard to find this year, so start early.
6: did I mention a new knife? oh, I see that I did, well it is worth mentioning again, don't you think?
7: and don't forget to get yourself ready by doing some target practice.
8: last but not least, get that new handmade knife, you know you want to, I see that Whitesell-knives has a new caping knife, that would come in handy for that trophy buck, you been dreaming about since last season.
Happy hunting to all of you guys and gals in this upcoming season. Good luck and be safe
Pro- Skinner
| Posted on May 25, 2009 at 7:09 PM | comments (1) |
This month I want to talk about my Pro- Skinner line of knives.
I have to say that the large model of the Pro- Skinner is inspired by a factory blade that I use to make when I was making kit knives, not an exact copy, but very close, the other two models are scaled down of the large model.
In this lineup, there are three models to choose from. Large Pro Skinner, the Medium Pro- Skinner, and coming some time this year a Small Pro- Skinner. All are clip point design blades. The Pro- Skinners are my high end line of knives, featuring, nickel silver bolsters, and pins, and thong hole with nickel silver tubing on the Large model. All are O1 tool steel, hollow ground to .018-.020 thick at the edge and sharpened at 20 degree secondary bevel.
This knife feels great in the hand and does a wonderful job of field dressing and skinning large game, it does a good job slicing and peeling, back at camp as well. And it also looks great on your belt.
There are a few options available for the Pro- Skinner, 440C stainless steel is one option, along with many handle materials, including G-10, Woods, Bone, Water Buffalo Horn, and my own laminated burlap material. All are mirrior polished, unless you prefer a satin finnish.
Specs: blade length is from bolsters to tip of blade.
The large model has a 4-5/8" blade made from 5/32" thick O1 or 440C steel.
The medium model has a 4-1/4" blade made from 1/8" thick O1 steel.
The small model will have a 3-3/4" blade made from 3/32" thick O1 steel.
Large and Medium models of the Pro- Skinner
http://i97.photobucket.com/albums/l228/dwknives/100_2215.jpg
Thanks for looking and Stay Sharp till next time, Dale
Why you should buy a Custom Handmade Knife
| Posted on March 29, 2009 at 8:01 PM | comments (3) |
Hello again, spring is finally here, and this month I want to cover some reasons to buy a Custom Handmade Knife, wheather it be mine or one of the other fine makers that you may know of, and there are alot of us around.
I know that alot of people wonder why someone would lay down a hundred plus hard earned dollars for a Custom Handmade Knife. I would like to help point out some good reasons.
The first thing is , you can have a knife made to do a special purpose, such as skinning game or a chopper, or a slicer. I know what some of you are thinking, "a knife cuts or it don't" thats true but you can have special needs for a knife, that requires some thought on the steel type used, high carbon, tool steel, or stainless, steel thickness, grind style, be it flat, convex, hollow, to name a few. How thin the edge should be, by that I mean a knife made to slice meat or tomatoes will be best if it has a really thin hollow ground edge, but a camp knife, made to do alot of task, from cooking chores to chopping kindling for the fire would be better with a convex grind, or flat grind with a secondary bevel, and a thicker steel for strength and weight for chopping. For an everyday carry knife I like a flat grind, ground to .020-.025 at the edge and sharpened at a 25degree angle. On a custom knife the heat treat can even be refined to match the intended use. A skinner can be harder than say one intended for chopping use, the skinner, being harder, will stay sharp longer, than the chopper, but it would not be good for chopping as it would most likely chip the edge, the chopper needs a tougher edge to hold up under the stress of chopping. Most knives are made for general purpose use with compromises made so they will do most tasks well, and that is what most users need, but if you have a special use in mind a Custom Knife may be the way to go.
One other reason for a Custom Knife is that a well made Custom Knife will last you a lifetime and the next owners lifetime too, if it is taken care of, of course.
You also have the option of handle materials on the Custom Knife of choice.
And the last reason that I will bore you with is, pride of ownership, I really love anything made by someone who takes pride in what they make, and is made one at a time, not mass produced.
So when you think about a new knife, take a look at a Custom Handmade Knife, handle some, and talk to some knifemakers about there product, you may see why folks will pay $100.00 plus for a knife is the same reason you buy a $300.00 dollar scope as opposed to a $50.00 one, Quality.
Thanks for your time, and stay sharp, Dale
Knife Care
| Posted on March 5, 2009 at 9:58 AM | comments (1) |
Hello again, this month I would like to cover a little about knife care.
I hear alot about how carbon steel will rust so badly, and it will if not taken care of, but with a few simple steps you can keep this to a minimum.
Here are some steps you can do to help.
1: Wash and dry your knife, by hand, never in a dish washer, after each use. Be carefull of the sharp edge.
2: Never store your knife in a leather sheath for long periods of time.
3: When in storage put some food grade oil on the blade, or you could use car wax, but be sure to clean completely before using on food items.
4: Do not store in a basement or other damp area.
5: Always wipe finger prints off the blade after you handle it.
And don't forget about the handle.
1: On wood handles you can treat it with gun stock wax.
2: Bone handles can be treated with a lite rub down of minerial oil.
And remember to sharpen your knife so it will be ready for the next use.
Untill next time Stay Sharp , Dale.
How a knife got its name
| Posted on January 31, 2009 at 9:28 PM | comments (1) |
This month I would like to give you a little history of my knife making, as well as how one of my knives got its name. The Original Skinner.
I first got interested in making knives, in 1982, after reading an article in a magazine about handmade knives. I didn't know where to start really, but I made one, and then several more over the next year or so. And then I lost interest in knife making due to the loss of my Dad and closing the welding shop that we owned together. I didn't make another knife until 2002, when I made kit knives for a year or so. Then in 2004, I started making my own blades.
One of the first knives I made in 82, was inspired by a knife made by Schrade, the sharp finger. It was not an exact copy but was close. It was made from an old saw blade, with a walnut handle. It has skinned a lot of deer in the past 27 years.
I still make that same knife today, but it is made from 1095 HC steel instead of saw blades, and wears many different handle materials. It also has a name now, something it never had before. The Original Skinner has been one of my most popular lower cost knives. It is a handy little knife that feels good in the hand. So now you know how it got its name.
Thanks for taking the time to look. Dale
Here is a photo of the original and one of a new Original Skinner
http://i97.photobucket.com/albums/l228/dwknives/knives/OriginalSkinner.jpg
http://i97.photobucket.com/albums/l228/dwknives/knives/100_1943.jpg

Sinceramente encanta estas fotos, mas como somos brasileiros e moramos no Brasil e aqui não se traduz nada para nós, passificos e do bem, não adianta nada essa montanha de sites gringos sem tradução para portugues serem enfiados em nósz guela abaixo.
ResponderEliminar